Protecting Dockerized and Proxied Wordpress With fail2ban (Without the wp-fail2ban Plugin)
I recently set up a new Wordpress instance on my host. Everything ran great but I noticed every few days that the CPU use on my machine would jump to 40% or so and sit there (normally CPU use on this machine is around 10%). top showed me that the top CPU users were a couple of php-fpm: pool www instances, which I traced back to my new Wordpress container.
I watched the logs for that container (docker compose logs -f) and I saw constant Wordpress login attempts:
172.19.0.2 -  05/Sep/2025:18:19:37 +0000 "POST /wp-login.php" 200
172.19.0.2 -  05/Sep/2025:18:19:37 +0000 "POST /wp-login.php" 200
172.19.0.2 -  05/Sep/2025:18:19:38 +0000 "POST /wp-login.php" 200
172.19.0.2 -  05/Sep/2025:18:19:38 +0000 "POST /wp-login.php" 200
Someone was trying to brute force the password on my site.
fail2ban
I’d like to block attackers making repeated login attempts while still making it possible for me (and other site admins) to log into the site without issue. Fortunately there’s already an app to handle this: fail2ban
There is a plugin for Wordpress that enables fail2ban support, but I had a really hard time figuring out how to get it configured, especially inside my setup with a dockerized Wordpress container behind a Caddy proxy.
Configuring php-fpm Logging for fail2ban
The first problem I needed to solve was to get php-fpm logging its access log to a file so that fail2ban could scan that file for attacks. I found the right configuration file for php-fpm logging at /usr/local/etc/php-fpm.d/www.conf inside the Docker container, so my first step was to copy the contents of that file out of the container into my host and mount it back into the container as a volume. I added this to my Wordpress docker-compose file:
    volumes:
      - ./www.conf:/usr/local/etc/php-fpm.d/www.conf
      - /docker/data/wordpress/logs:/usr/local/var/log
(Click here for a copy of the final www.conf file [SPOILERS])
I also added a volume where I could output logs so that fail2ban on the host could read them.
Most of what I needed was already in the file as an example, but commented out. I enabled the access log in php-fpm’s www.conf:
; The access log file
; Default: not set
access.log = var/log/$pool.access.log
I restarted and I was able to see an access log every time I loaded a page on my Wordpress site!
172.19.0.2 - 07/Sep/2025:05:21:25 +0000 "GET /index.php" 200
Proxying Throws a Wrench in fail2ban
I’m running multiple Docker containers on my host, all of them serving different web services. To support that I have Caddy listening on port 80 and 443 of my host and running a reverse proxy to my various Docker containers depending on the hostname in the request.
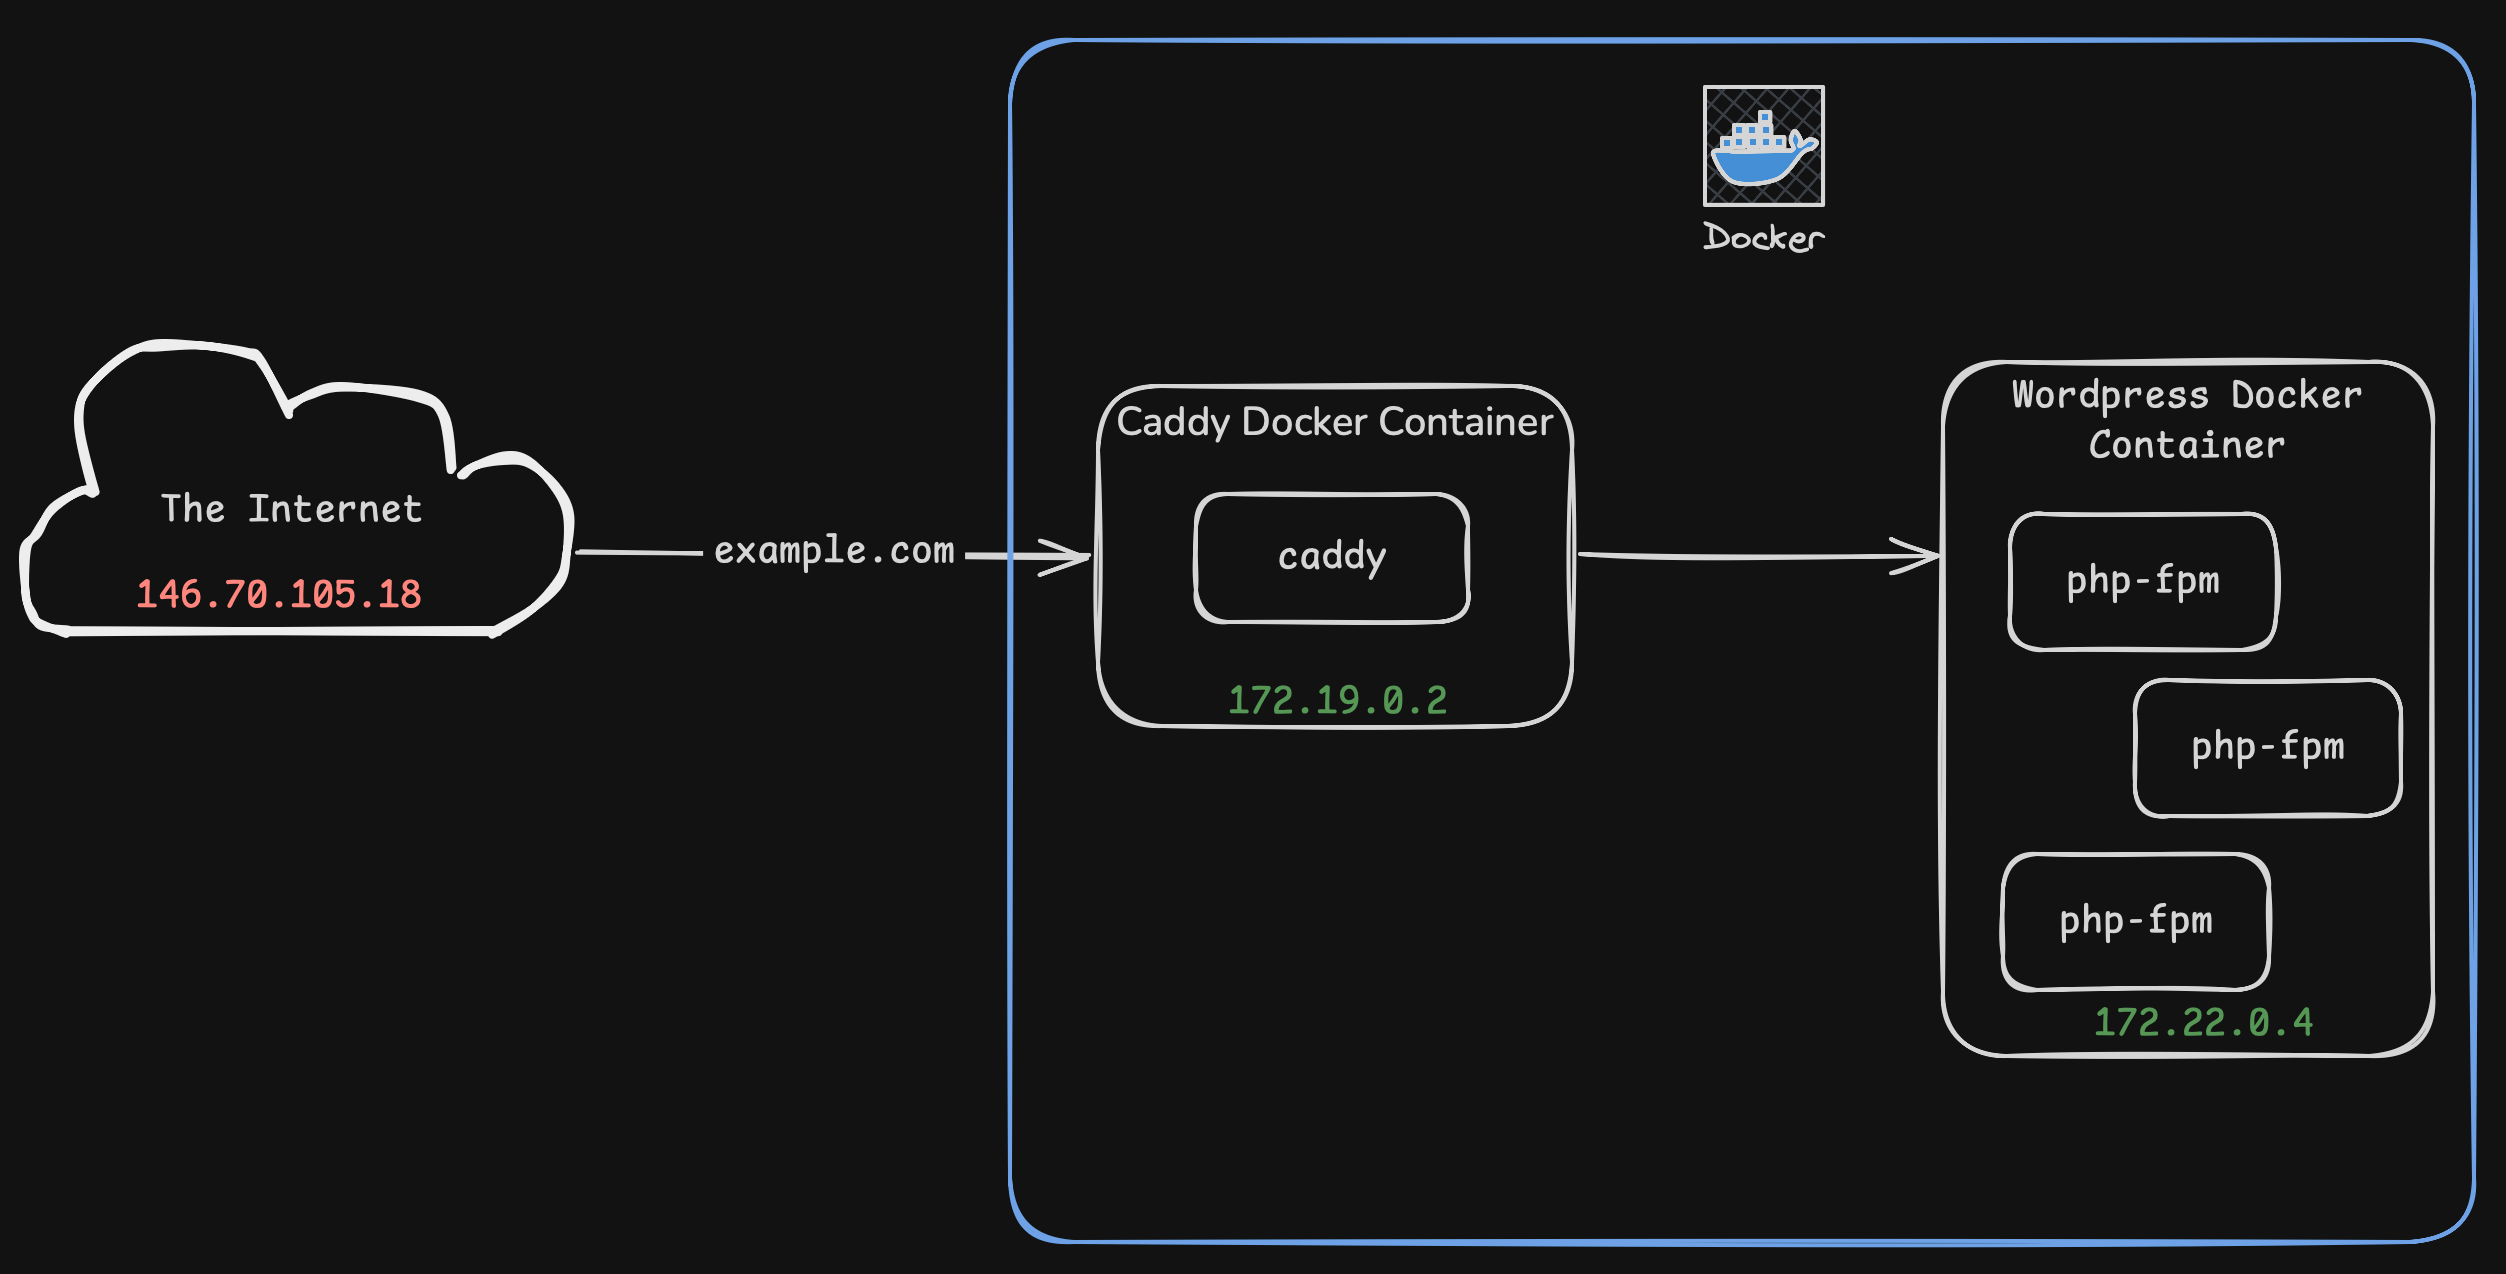
Caddy receives a request from the internet, then proxies that request to the Wordpress docker container. This means that while Caddy sees the IP address of the attacker as 146.70.105.18, Wordpress sees the request as coming from 172.19.0.2, the private IP address of the Caddy container on my internal Docker network.
If I enabled fail2ban right now my whole site would quickly get blocked since the first attack would block the IP for my Caddy proxy and no legitimate requests could get through either.
I needed to figure out a way to get the real IP address that connected to Caddy piped through to php-fpm. This turned out to be much trickier than I expected. After a lot of trial and error I finally found that Caddy can push data into environment variables before passing the request to php-fpm. I can stash the remote IP in an environment variable in Caddy, then print that value in php-fpm’s access logs.
Here’s what that looks like in my Caddyfile:
example.com {
    root * /wordpress

    encode gzip
    php_fastcgi wordpress:9000 {
        root /var/www/html
        env REMOTE_ADDR {remote_host}
    }
    file_server
Now we can add %{REMOTE_ADDR}e to our access log line to see the original IP that the request came from:
access.format = "%{REMOTE_ADDR}e - %u %t \"%m %r%Q%q\" %s %f %{milli}d %{kilo}M %C%%"
(The only relevant bits necessary in the format string for fail2ban are %{REMOTE_ADDR}e %m %r%Q%q %s but the other performance information is nice to see)
Another thing to note is that Caddy rewrites the URI to index.php and sends it off to php-fpm if there isn’t a matching file on disk (read more here). This means that all of the php-fpm access logs will display index.php as the URI. To see the original URI I passed another environment variable through Caddy:
    php_fastcgi wordpress:9000 {
        root /var/www/html
        env REMOTE_ADDR {remote_host}
        env REMOTE_URI {http.request.orig_uri.path}
    }
Then I replaced %r in the format string with %{REMOTE_URI}e to see the actual path:
107.137.65.4 - 07/Sep/2025:06:02:30 +0000 "GET /about-us/" 200 /var/www/html/index.php 404.286 18432 89.05%
Setting up fail2ban for Wordpress Logs
The next step is to configure fail2ban to watch these access logs for wp-login.php login attempts. I’ll assume you already have fail2ban installed and configured.
First, create a filter file for wordpress login attempts at /etc/fail2ban/filter.d/wordpress.conf
[Definition]
failregex = ^<HOST> .* "(GET|POST) /+wp-login.php
	        ^<HOST> .* "(GET|POST) /+xmlrpc.php
A small side note: it would be great to have this rule match on 401 Unauthorized errors so that we don’t accidentally ban anyone who is successfully logging in, but Wordpress always returns 200 Success for the login page, even if authorization failed. The login error is passed in the request body.
Next, create a wordpress jail that uses that filter in /etc/fail2ban/jail.d/wordpress.conf
[wordpress]
enabled = true
port = http,https
filter = wordpress
logpath = /docker/data/wordpress/logs/*.access.log
Restart fail2ban with sudo service fail2ban restart and watch the logs with sudo tail -f /var/log/fail2ban.log. Open a browser and load wp-login.php on your website a couple times in a row (I set maxretry = 3 in my jail.local, the default is 5). I like to use Segfault’s disposable root servers for this so that I don’t have to worry about banning my home IP.
2025-09-07 02:23:34,333 fail2ban.filter         [1868841]: INFO    [wordpress] Found 169.150.198.78 - 2025-09-07 02:23:33
2025-09-07 02:23:37,036 fail2ban.filter         [1868841]: INFO    [wordpress] Found 169.150.198.78 - 2025-09-07 02:23:36
2025-09-07 02:23:38,810 fail2ban.filter         [1868841]: INFO    [wordpress] Found 169.150.198.78 - 2025-09-07 02:23:38
2025-09-07 02:23:39,015 fail2ban.actions        [1868841]: NOTICE  [wordpress] Ban 169.150.198.78
Success! However, there’s one more problem- even though my client IP was banned, I was still able to get responses from the server. I checked iptables and the ban was definitely in there:
Chain f2b-wordpress (1 references)
target     prot opt source               destination
REJECT     all  --  unn-169-150-198-78.datapacket.com  anywhere             reject-with icmp-port-unreachable
RETURN     all  --  anywhere             anywhere
It turns out that any traffic heading to Docker is sent to the FORWARD chain in iptables because it’s being sent on to another IP address, while traffic destined for a local process goes through the INPUT chain. fail2ban assumes it’s protecting local processes, so it sets its bans on the INPUT chain:
Chain INPUT (policy ACCEPT 0 packets, 0 bytes)
 pkts bytes target     prot opt in     out     source               destination
   49  7490 f2b-wordpress  6    --  *      *       0.0.0.0/0            0.0.0.0/0            multiport dports 80,443
However, this traffic ends up going down the FORWARD chain to get to Docker, which means it never sees the INPUT chain or the rule that fail2ban just added to block this IP.
Chain FORWARD (policy ACCEPT 0 packets, 0 bytes)
 pkts bytes target     prot opt in     out     source               destination
7271K 4167M DOCKER-USER  0    --  *      *       0.0.0.0/0            0.0.0.0/0
This Stack Overflow answer has more details and links to lots of documentation about this if you’d like to read more.
Fortunately, fail2ban can handle this situation, we just need to tell it which iptables chain to write the rule into:
[wordpress]
enabled = true
chain = DOCKER-USER
port = http,https
filter = wordpress
#action = iptables-multiport[name=wordpress, port="http,https", protocol=tcp]
logpath = /docker/data/fwalliance/logs/*.access.log
With this in place we’re now successfully blocked at the firewall after three attempts to load wp-login.php.